Monday, July 23, 2018

PJK book addresses stepdown transformer

PJK book addresses stepdown transformer

In the PJK Don Smith book, a graphic is shown with a stepdown transformer.  It is shown here:

No capacitors are shown here either, and said to be optional for tuning.  I will attempt to shift to my calculated values for the caps and be attempting to find resonance with a diode or neon bulb also.  Notice the resistor, as it seems a requirement.  On p82, it states:

"This simplified circuit avoids the need for expensive capacitors and the constraints of their voltage ratings, and the need for electronic control of the output frequency. The wire length in the turns of coil "L2" still needs to be exactly four times the wire length of the turns in coil "L1", but there is only one component which needs to be introduced, and that is the resistor "R" placed across the primary winding of the step-down isolation transformer. This transformer is a laminated iron-core type (as is my MOT!), suitable for the low mains frequency, but the output from "L2" is at much higher frequency. It is possible to pull the frequency down to suit the step-down transformer by connecting the correct value of resistor "R" across the output transformer (or a coil and resistor, or a coil and a capacitor). The value of resistor needed can be predicted from the American Radio Relay League graph (shown as Fig.44 in Don's .pdf document which can be downloaded from the www.free-energy-info.com website).  The sixth edition of the Howard Sams book "Handbook of Electronics Tables andFormulas" (ISBN-10: 0672224690 or ISBN-13: 978-0672224690) has a table which goes down to 1 kHz and so does not need to be extended to reach the frequencies used here. The correct resistor value could also be found by experimentation. You will notice that an earthed dual spark gap has been placed across "L2" in order to make sure that the voltage levels always stay within the design range."

Regarding my MOT, it has a feature where the high voltage winding is terminated to the iron core and frame as a ground.  Given that the Center Taps on the air coil is ground, I have decided that is a bad feature and have disconnected the HV winding, letting it float.  I have hooked up the L1, L2 and MOT without any diodes.  I get some nice HV voltage into the HV MOT from L2 and can get a nice spark on a gapped connector, but without the R at least, I am not getting much voltage on the low voltage MOT winding.  You apparently will lose the higher frequency operation.

Sunday, July 1, 2018

L2 Construction

L2 Construction


I have not been able to find some essential components to build my L2 by the method found in the PJK's Practical Guide to Free Energy Devices on Don Smith Resonant Energy Systems publication. I think it might be easier than what I have so far, but I may try it next time, as I still hunt for what else I need for those construction techniques.  I have everything I need for my alternative and have started it.  Here is a picture of the components:


My basic construction will be each coil half will be shaped around the white rings cut from a 3.5 PVC pipe.  Each half will have a ring on each side and fastened together on 4 5/16" fiberglass poles.  Each pole will be countersunk and held by a 2-56 screw and epoxied also.  In order for the coil to have a 1/4" spacing, a slot will be made in each pole, but staggered by 1/16".  In order to make those slots I put 4 poles in a wood holder with the stagger step at each block on the side.  I can now make 4 slots on each pole, which I have already marked on the whit poles.  I will use 2 blades together to get the required .08" slot for 12ga. wire.   I calculate the coil length to be about 5" but the total length will be 6", in case I need to move out to gain resonance.


Making some progress on the L2 construction.

Slipping the coil over the frame

The lower former is 1/2" smaller


The CW coil completed


Stumped on switching inductance diodes

I wish to build an SG with a step down transformer to control output vs a voltage divider as shwn in this sketched diagram from my original source material.  Notice it shows the use of 6 diodes, 2 switching inductance diodes, I have assumed, as Chris has spoken of in this thread these, and a diode bridge.


  Here is the schematic of the "Early Model" with the 8kv cap bank in the PJK Smith book.  :


next pozt
Looking for any input from members.  But here is how I plan to proceed.  First I will assemble the L1-L2 circuit with switching diodes and cap and look at output in an obtuse fashion as I am estimating 4000v on the step-up at L2.  I will also let L2 receive a weak input and see if a diode be used to check for resonance.  I am planning a distant broadcast from L1 to energize L2 for that.  I do not have a signal generator and if I can slightly energize L2 with L1, I may not need one just yet.   I am not interested in determining if I get the 4000 volts, whether or not it is OU at this point.  I have no ideas on how I could determine the performance of such a high voltage.

If successful results are achieved, I will look at building my own stepdown aircore transformer built to operate at the resonant frequency of L2, hoping to stepdown the output to the 50-200v range.  A standard inverter can be used to convert to usable energy. in this range.

I have been thinking about a stepdown transformer coil that may have 2 layers of wire.  If you wind down one side of a tube on one layer and then reverse and wind back up in the same direction, THIS POTENTIALLY CREATES A PARTNERED OUTPUT COIL!  I am not sure that would be a good thing.  If things go as advertised, do we really need to shake loose anymore electrons at a potential 20,000 COP?  So goes the art of winding a transformer then...  Something to think about.  But I think, since it is a transmitter, would it be the 1/4 wavelength coil?  I would think not.  It must have more turns than the secondary.  I intend to study stepdown transformers now, but I would like to throw out a question to members on its construction.   I think that the secondary as a receiver of 26.8 MHz, needs to be one wavelength, about 36'.  Since I wish to run a ~50v inverter off the secondary, it needs to step down the voltage a factor of 80.  So the primary would need to have 80 times the number of turns of the secondary, but yet still be evenly divisible by one wavelength in order to resonate at the system's frequency.


Tuesday, May 1, 2018

High voltage using car ignition coil


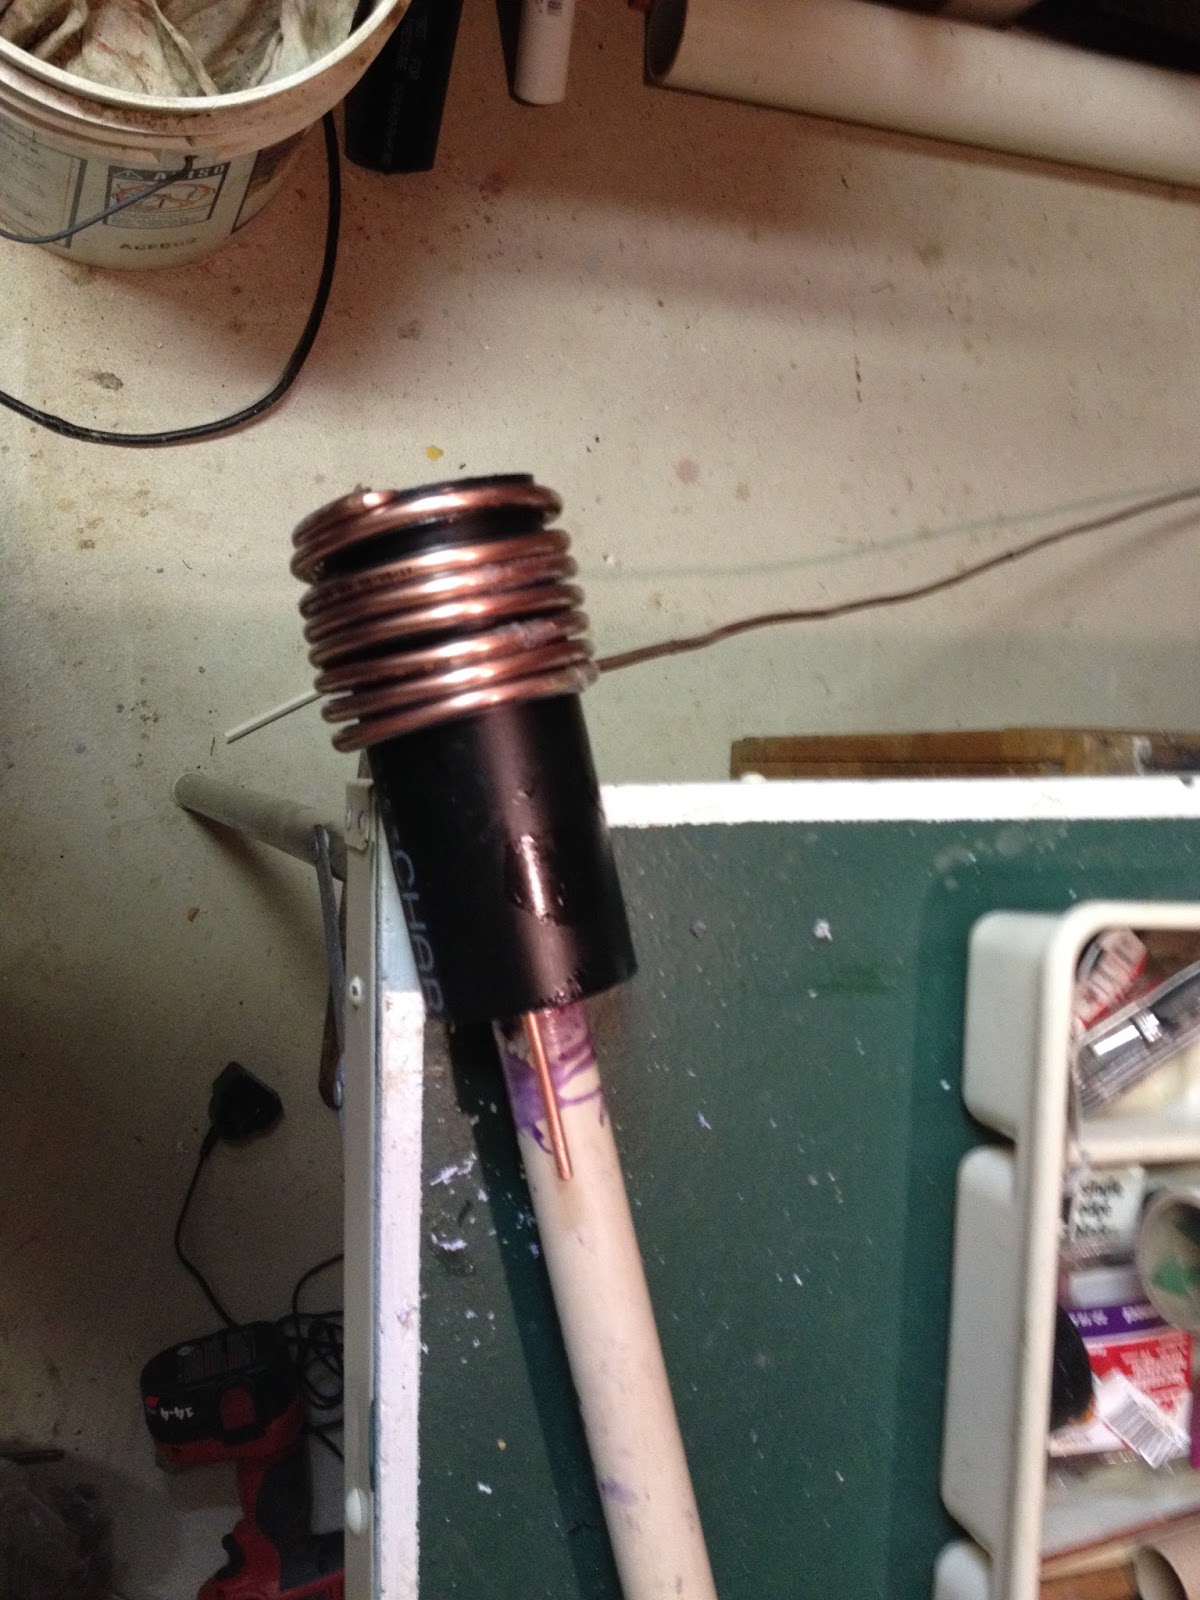
I have been contemplating my next move.  The SGFP in the NST I believe is a big problem. Here is a picture of it with the access plate on the bottom removed.  The potting compound over the transformer in the left compartment is epoxy-based and impossible to deal with.  As long as it is just the transformer in there, there should be no need for access as long as sufficient wiring comes out to feed the primary properly.  The compartment on the right hopefully contains all wires and circuitry needed for access as the potting compound there is very soft and easy to remove.  So it appears possible to perform an operation to remove the SGFP circuitry.  Is there an oscillator circuit that should be preserved?  If it is destroyed during potting compound removal, is the transformer ruined for a Smith Generator?  


I am betting the oscillator circuit is not needed, by looking at Marathonman's post of Tesla's spark gap circuit to power a secondary and tertiary coil.  But if I tear it apart will I be able to preserve complete access to the transformer part?  That has led me to look for some other options.

Comparing the Smith Generator to the Tesla circuit,  the L2 is really the tertiary coil counting from the power input perspective.  But how does a circuit spark at such high frequencies without any oscillator circuitry and diodes to gracefully feed a capacitor to spark voltages?   I am beginning to think the Smith Generator is probably not operating at 35.1kHz of an NST, but at the 220 MHz that Don mentions in his videos and book.  In the Resonant Energy Systems book on p42, he states,

"Let us then compare the 60 c.p.s. System with my 220 MHz Device."

Two questions need answered.
  1. How can the "early device" we are trying to build actually be Don's 220 MHz Device, and operate at the 220 MHz frequency and not 35.1kHz?
  2. How can the Tesla device operate without a diode/capacitor circuit to build voltages for the spark gap?

I would say what is needed to generate extra power is high voltage, high frequency, and resonance.  Keeping these principles on the table going forward, lets look at question 2 first.


Fellas,  Thanks for the switched  inductance info on the output and the Utkin PJ Kelly document.  I felt I was missing something in my adaptation of the DS circuit.  But I have noticed several pictures without them now in the Utkin Document, having just a bridge rectifier, as in my schematic.  The hand drawn circuit given early in the thread out of my source document for building a DS generator has both.  But it also shows using a voltage divider at 8000v which to me would be very "hairy".
I will be studying the Utkin document more.   

So we seem to be contemplating running the DS Generator L1 circuit without diodes (at least I am).  If you notice in my last picture of my disassembled NST, a GM ignition coil is lurking upper right.  These are pretty powerful and I have already show how they can provide powerful sparks, as I have shown with a picture and simple Tesla-like circutry, previously.  This model has dual HV output, to drive 2 spark plugs at the same time, and it would also spark at the top of every piston stroke, exhaust or power. Tthe DS PJ Kelly book on P95, has a diagram of a circuit dispensing with the NST and using ignition coils.  It shows a very high power rating, current and voltage.  It is shown below.  
Notice that it includes oscillator circuitry and uses the diodes.  Building a faster oscillator was discussed in the thread previously, to try to get up to a MHz range, but it is apparently unnecessary as long as you are using a spark gap that fires sufficiently fast.  With my L1 coil length of ~18', I am off the top of my head looking at maybe 18Mhz quarter wave.  I think this is a big step so far and I am confident it will work.

Success, sort of.  I am getting +10,000v with my new car coil, 2uF cap, and dimmer.  However I seem to have no control with my dimmer.  I sure would like to put out about 1000v here.  Well this bypasses the diodes and SGFP issues!  Whew, at least its sparking!

How to Make Uni-directional Wound Coils "Buck".


In Chris' partnered coils hyiq lead off photo, let us examine coil winding and current flow.  As we employ this circuit, we us AC current as Nikola Tesla and Don Smith did.  Lets take a snap-shot of current flow in one direction, as indicated by the black current arrows in the coil wires.  Due to the change in coil winding direction from Clockwise to Counter-Clockwise, these coils generate opposing North magnetic fields, cancelling themselves to give us current amplification.


In the video I posted back in Jan. on Kdkinen's work on the Smith Generator, he uses Barker-Williams stock coils hooked up in "series", just as Don shows in his display model, all wound in the same direction.  He notes he gets significantly better performance, however, when he has hooked the coils up in "parallel".    Then the question becomes, "Can you make two coils wound in the same direction behave as indicated above when they are wound either both CW, or CCW?  If so, how?"  I wish to illustrate what he means using Chris' diagram slightly redrawn to illustrate it.  In the following diagram, both coils are wound CCW.  The twist direction is a coils unique property.  It is the same no matter how the coil is rotated to examine it.  The right side coil is the same and in this snap-shot of DC current, with it exiting out at connection B, the same for Chris' coil.

In order for the left coil to generate an opposing N magnetic field, the current must be driven in the opposite direction if both coils are wound in the same direction.  Using the right-hand rule, the input point A of the left coil must be moved to the middle of the whole coil.  The center-point connection C must now be made from the left side of the coil to the left side of the right coil.  For a CW coil to generate cancelling N magnetic fields, the current flow in the above diagram must be reversed also.  That is how an off-the-shelf Barker-Williamson coil, or any set of coils wound in the same direction can be connected to achieve partnered output performance.

Wednesday, April 11, 2018

L1 Construction Pictures

Insde L1 coil with one wrap complete
Inside L1 coil with one wrap complete
L1 wrap half complete


L1 coil 19 turns, needs clamp

Starting L1 coil wrap

Coil holder and bare 12ga wire with vinyl tube insulation
L1 Circuit Assembled


Microwave Oven High Voltage Diode Rectifier HVM12 12KV 350MA

2CL20KV 30mA High Voltage Diode Rectifier HF Tesla Coil

Thursday, January 25, 2018

Early Smith Generator with enumerated components

Early Smith Generator with enumerated components.


Smith Generator High Level Schematic

  1. Smith Generator High Level Schematic


This graphic has power output at 8000vdc.
This is the early smith generator model.  I believe this is just a non-working display model with built in flaws.